Title here
Summary here
This page provides assembly instructions for the OpenCCA automation box. Before starting, make sure you have all the parts listed in Hardware.
The box is organized in three layers:
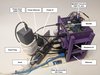
More assembly pictures can be found in the opencca-box repository.
Dock (Anker PowerExpand) connects to:
Raspberry Pi (Flash Server) connects to:
RK3588 connects to:
Install Raspberry Pi OS onto the SD card of the Pi.
The Pi serves as the flashing and power management node. For firmware compilation, use a dedicated
x86 machine and mount the build directories into the Pi via sshfs. This setup allows you to compile
on a faster x86 machine while the Pi handles flashing operations.
The docker container in opencca-flash provides the required environment for the Pi.
Connect the Raspberry Pi to the Ethernet switch using a short patch cable. Connect the switch to your network using a longer uplink cable. The RK3588 also connects to the same switch for network access.
z Connect the USB-TTL adapter to a USB port on the Raspberry Pi. See Connect to UART for detailed pinout.
The Raspberry Pi can back-power the RK3588 over USB even when the smart plug is off. To achieve a true hard reset, both power sources must be removed:
uhubctlSee scripts in opencca-flash/board/power.